![]()
Beautiful Plants For Your Interior
![]()
Beautiful Plants For Your Interior
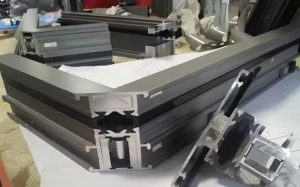
Installation process of sliding doors and windows
Frame and sash cutting → Frame and sash milling opening → Mill lock hole groove → Drill hardware hole → Cut glass trim → Install frame and sash sealing strips → Install glass trim → Frame and sash combination → Install hardware accessories → Inspection → Packaging → Storage
Push-pull door and window manufacturing process
Frame and sash are cut into pieces → Frame and sash are milled to form openings → Drilled drainage holes → Drilled locking slot → Attach felt strips → Drilled for hardware → Cut glass trim → Install sealing felt strips → Install glass trim → Install pulleys → Combine frame and sash → Inspect → Package → Store in warehouse
A、Cutting of the frame material
1、Calibration of measuring tools: Verify the error between the scale of the double-head sawing machine and the steel tape measure; if two double-head saws are used to cut the outer frame profiles of the same window separately, the two double-head saws must be calibrated until the sizes of the scales of the two sawing machines and the steel tape measure are consistent.
2、Precision control of the cutting material size: For the same size of cut materials from the same batch; the first piece of material is double-checked twice to ensure the size is correct before starting the cutting process. At the same time, during the batch cutting of the same size, the dimensions of the workpieces are randomly inspected to verify if there are any errors in the cutting.
3、For the cutting of the outer frame with a 45-degree angle. When cutting the first piece of material, use a universal angle ruler to check that the angle error value is no more than 10 micrometers.
B、Frame material processing – hole and groove milling
1、Sliding outer frame. The inner column of the outer frame needs to be machined with slots and dovetails. During the machining process, first use the same type of scrap aluminum or cut a short sample to test, to ensure that the slots and dovetails of the inner column fit tightly with the corner joints of the outer frame after machining.
2、Push and pull the outer frame. When milling the sliding part of the push-pull frame, first use the template to mark the position, until the sliding material is milled to a depth that completely fits with the frame, then use new material to continue milling. When milling the stem bars of the sliding pulley as drainage holes, their length should not exceed 20mm. The lengths at both ends should be the same. For 1800mm, mill two drainage holes; for lengths exceeding 1800mm, mill three drainage holes. The up and down sliding after milling should be strictly matched to avoid milling errors or reversals. When milling holes and milled parts, the profiles should not have scratches or marks.
C、Fan material processing – hole and groove milling
1、Push-pull doors and window sashes; the chamfered edges of the glazing should be precisely milled to be square, with consistent left and right allowances. The adjustment holes for the pulleys should be correct, and the distance from the holes to the edge of the profile should be consistent on both sides. The height of the lock holes for push-pull doors: for sashes with a height of 2300mm or less, the vertical distance from the lock hole to the ground should be 950-1150mm; the height of the lock holes for push-pull windows: the vertical distance from the ground should be 1500-1600mm; the height of the lock holes for adjacent doors and windows must be consistent.
2、Sliding doors and windows; Milling the height of the lock hole for sliding door: The vertical distance from the ground is 950 – 1150mm; Milling the height of the lock hole for sliding window: The vertical distance from the ground is 1500 – 1600mm; The lock hole of the sliding window must be consistent with the edge of the profile, with an error of no more than 1mm. The height of the lock hole must be consistent with that of the adjacent windows. The opening position of the lock hole for the suspended window is centered and milled.
3、If the outer frame of the sliding window needs to have reinforcing ribs, the length of the reinforcing ribs must be consistent with the specification length of the sliding support. The direction of the reinforcing ribs must be the same as the opening direction of the sliding window.
D、Milling of the cross-sectional shape of the middle beam in the frame material
1、The length of the milling gap of the middle beam is equal to the distance between the inner angle of the 45-degree outer frame and the edge. Moreover, when the middle beam is-joined with the 45-degree outer frame, there should be no phenomenon of bulging or contraction at the end of the middle beam.
E、Cutting of corner pieces for frame and shutter materials
1、The width of the frame and fan angle code should be less than 1mm less than the inner wall of the profile. And it is necessary to check from time to time whether the width of the angle code matches the profile. The cross-section of the angle code should be a right angle, and the surface should be smooth and free of burrs.
F、Frame and fan assembly corner processing
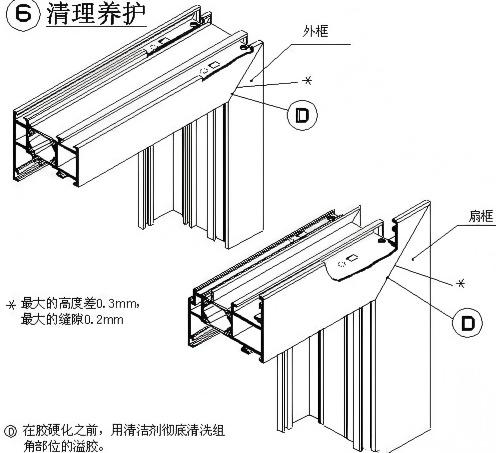
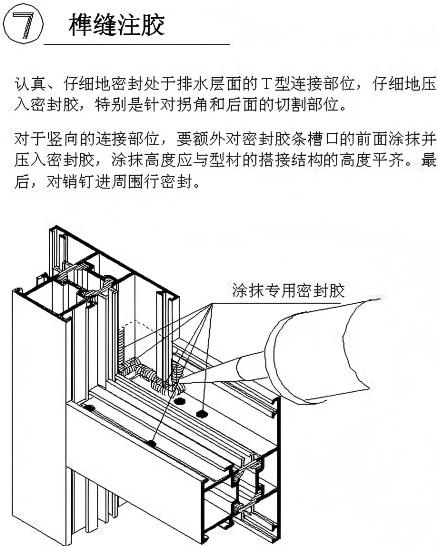
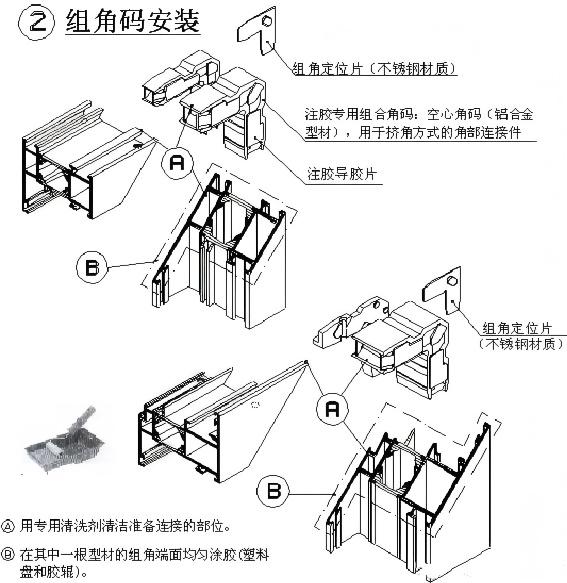
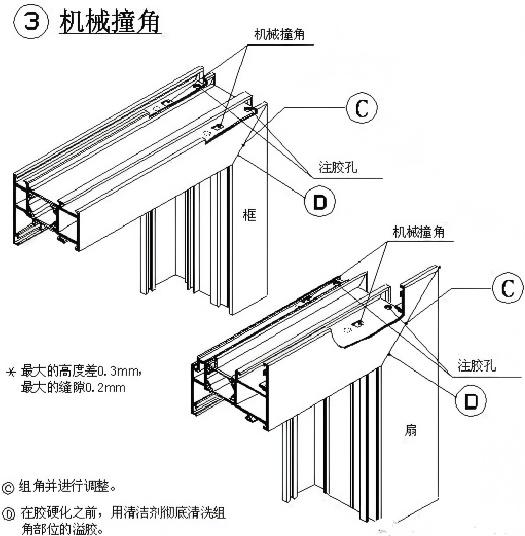
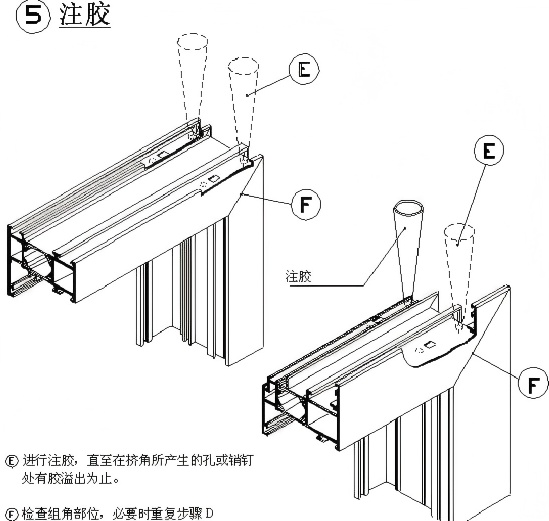
1、The joint grooves and tenons must be connected by elastic mechanical means. The gaps between the components and the profiles must be sealed with adhesive. The tenon joints need to be sealed with high-grade joint adhesive, ensuring no leakage points. The aluminum alloy corner joints must be processed using the adhesive corner joining method. Before corner joining, the cross-section of the profiles must be coated with special corner joining adhesive. The corner positioning pieces must be made of stainless steel. The gaps between the corner joints and the profiles must be filled with high-pressure adhesive, and there must be no loosening phenomenon.
G、Frame hardware assembly
1、Start installing from 150mm away from the corner of the frame, and the spacing should not exceed 600mm.
H、Assembly of hardware components
1、The pulleys, limit pins and other hardware components of the sliding door must not be omitted or installed incorrectly. The straight and cross hairs on the door must be firmly bonded. For sliding doors, the position of the sliding support should be tested first, and then installed in batches after confirmation. The sliding support screws must not be missing. The sealing rubber strips on the flat-opening doors must not be cut, and the joints should be adhered to the bottom of the door.
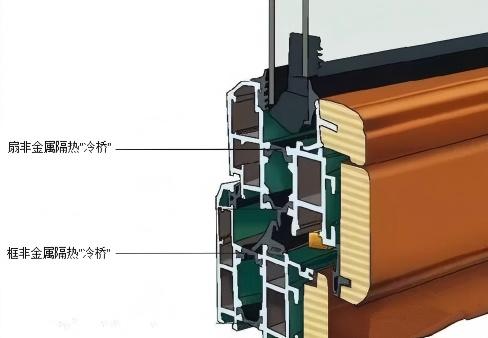
I、Assembly of glass windows
1、The glass labels should face the interior. When the glass comes into contact with the profile, use glass spacers and spot-type adhesive strips to position it. After visually confirming that the edges of the magnesium strips are evenly overlapped, apply the adhesive. Once the adhesive dries, trim off the excess.
J、Door and window quality inspection
1、The material processing must be completed in the factory to ensure the aesthetic appearance and the precision of the corner angles (45 degrees); for each corner of the aluminum alloy doors and windows, waterproof double-angle sealing treatment must be carried out (two-component sealing: Guardian, All-in-One); special attention should be paid to the quality of the internal partition strips of the glass, and the levelness and verticality should be controlled (within an error of 2mm), as well as the overlapping position of the internal and external window sashes’ partition strips.
Elastic connection technique
Step 1: Profile drilling
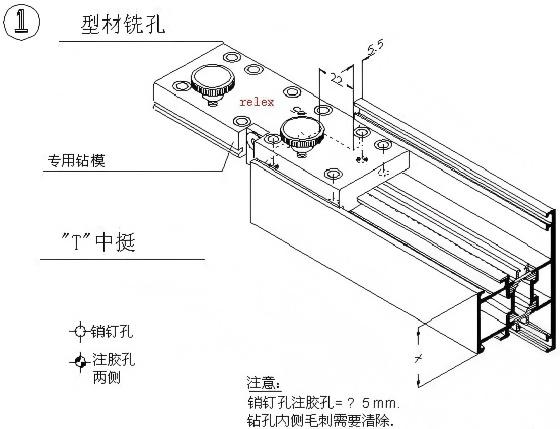
Step 2: Install the sealing pillow (elastic pad)
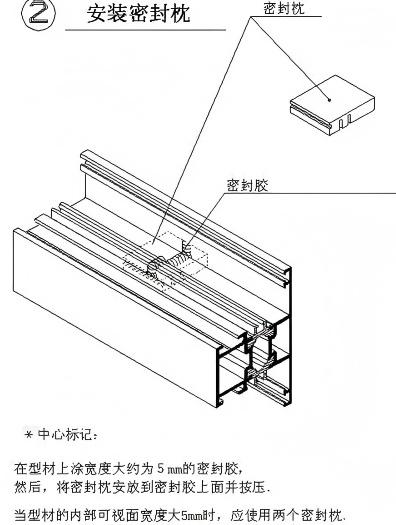
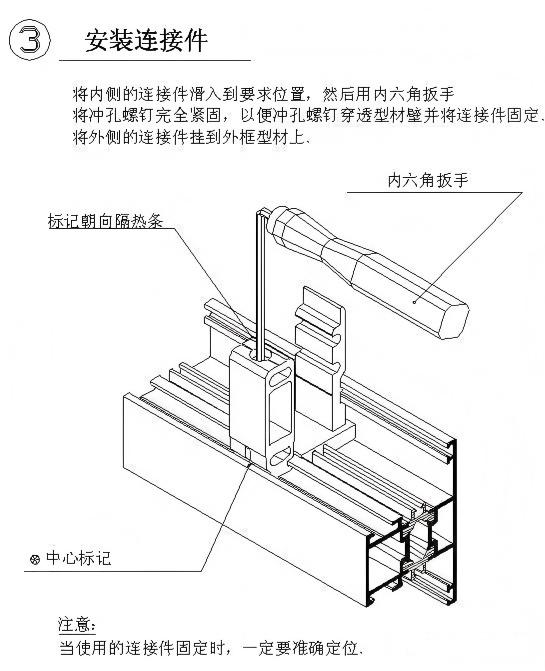
Step 3: Install the connecting pieces
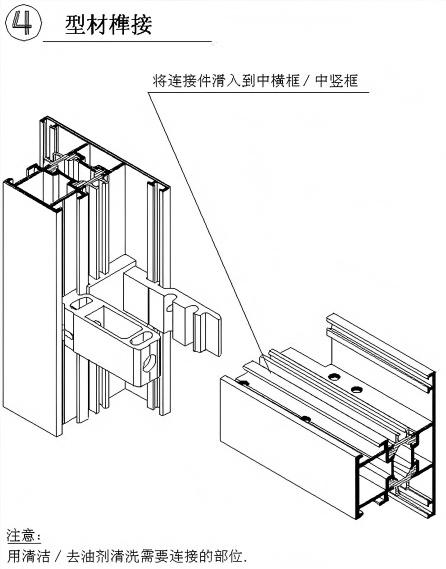
Step 4: Profile dowel joint
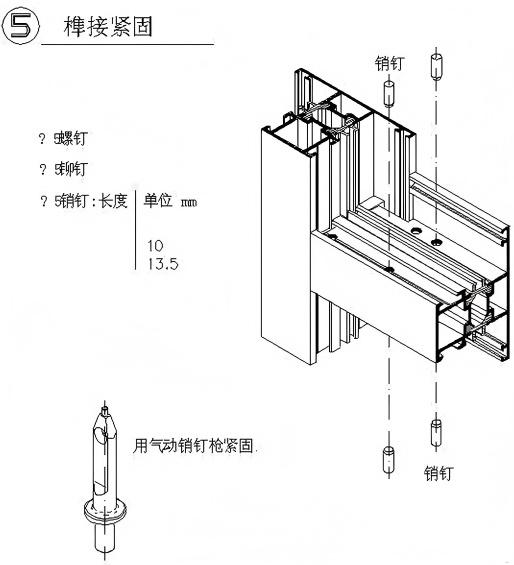
Step 5: Fasten with mortise and tenon joints
Step 6: Apply glue to the mortise and tenon joint
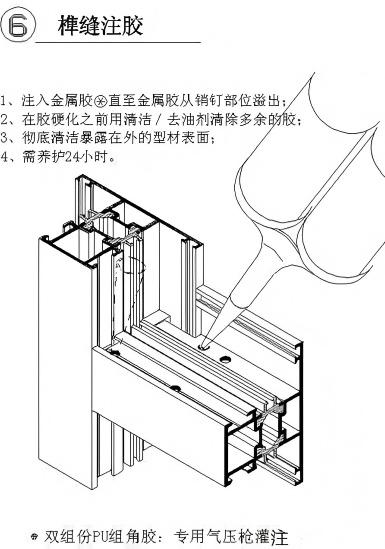
Step 7: Apply sealant to the mortise and tenon joints
Injection molding process for the corner of the part
Step 1:Profile milling hole

Step 2:Corner code installation
Step 3:Mechanical beakhead
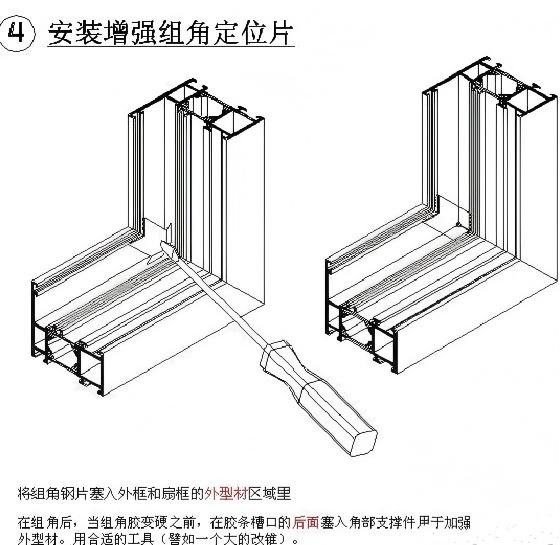
Step 4:Install the enhanced group angle positioning plates
Step 5:inject glue
Step 6:Maintenance and cleaning